
- Home
- Subscribe
- Magazine
Current Issue
- Table of Contents
- Feature Article
- Subscribe
- X's & O's Vault
- Gridiron Store
- Help
- Contact Us
The Six-Step Program to Becoming a Better Defensive Lineman
© June, 2014
by Ron Cook
Head Coach - Red Springs High School (NC)
To be fundamentally sound, proper technique and repetition can improve the skills of your defensive linemen.
I teach defensive linemen to be technicians and to be fundamentally sound so they can become the best players that they can be physically and mentally. On the first day of pre-season camp, I give the defensive line something I call the S.O.P. (standard operating procedure) for becoming a successful defensive lineman. It is a 6-step program that is applied every day but takes most defensive linemen three years to master. To identify who has reached a mastery level of the 6 steps, you will see in the games and on film every step being properly executed on each play.
This program also provides an outline for defensive line individual drills that are game- related. I will also use the program to quiz the players throughout the year during workouts or practice by calling on a player and asking him what is step 3, and if he gives me the wrong answer, he has to do 10 pushups on the spot. In the pages to follow, I will break down the 6-step program to becoming a successful defensive lineman by giving examples of the drills that I apply to each step throughout the season.
STEP 1: ASSIGNMENT AND ALIGNMENT
HOW TO TEACH FILM STUDY: I once had a defensive backs coach tell me that the defensive line is the easiest position to play or coach on the field because all they need to know is when to go straight, left, or right. While I will admit that the defensive line has the least amount of thinking required before and after the snap when compared to defensive backs and linebackers, it does not mean that they are exempt from being mentally sharp and knowing their opponent any more than their defensive teammates. I believe that skill and athleticism can make a player a good D-lineman, but good fundamentals and paying attention to detail can make an All-American!
Since the first season I began coaching I have always watched film with my players by teaching them what to look for in their opponent. During the season I have an opponent offensive line grade sheet that every defensive lineman must have finished by the day before the game. This sheet teaches defensive linemen how to study opponents� blocking schemes by looking at the footwork of the offensive lineman, the blocking angles, contact off the ball, pass sets and more. One other important factor that the sheet helps the defensive line focus on is the quarterback�s exit strategy; that is, which way does he like to scramble or where does he like to step up in the pocket to avoid pressure.
Each defensive lineman will have to grade two offensive linemen that they will be lining up against. The defensive ends will typically grade the offensive tackles and tight ends and the defensive tackles will grade the center and guards. I will also use the same sheets to give my grade to the offensive line as a whole and to compare with the defensive line�s grades, so I can judge whether or not they are watching film the way they should.
The night before the game we will have a meeting where we go over the grades of each offensive lineman. I will call on a defensive end to report his grades on the left tackle. Then I may call on a defensive tackle to give me his grades on the center and we will go around the room until we have talked about every offensive lineman we saw on film. This is beneficial in several ways, but what I have found to be the most important is that the players sometimes see �play indicators� or hints from the O-line that I may have overlooked, the players start recognizing �special� formations or threats in a formation that could affect them, and it builds confidence in knowing their assignments and executing the game plan.
In today�s world of technology, watching film has never been easier for coaches and more accessible to players. With NCAA regulations restricting the amount of time you can spend with your players, this is a great way to monitor their film study and keep track of who wants to get better individually.
STEP 2: DOMINATE YOUR BLOCKER
Stance: The key to teaching good technique starts with teaching GREAT fundamentals and GREAT fundamentals ALWAYS starts with a proper stance! Any good defensive lineman worth his salt will always be seen lined up in a good stance.
Hands: On the first day of practice in the spring or summer, we will always start with learning the proper stance in relation to the ball. What this means is that all defensive linemen on the RIGHT side of the ball will place their inside (left) hand down (hand closest to the ball). All defensive linemen on the LEFT side of the ball will place their inside (right) hand down. The hand that is down needs to be as close to the ball as possible without being offsides and in the neutral zone. The hand that is not down needs to be out in front of the knees and ready to fire from anywhere but the thigh. I will never allow a defensive lineman to �rest� his hand on his leg!
Feet: �Same hand same foot� - this is a phrase that I will use often when referring to stance, escapes, and pass rush. If the right hand is on the ground then the right foot is back and the same goes for the left hand and left foot. No wider than shoulder width apart, I like for the toes of the foot that goes back to be even with the heels of the front foot (defensive tackles may be slightly closer). The knees should be bent enough where the defensive lineman�s rear end is comfortably pointed up in the air causing aforward lean. The body pressure applied to the fingers of the down hand should be enough to make the defensive lineman fall forward if a coach came by and kicked his hand from out in front of him.
Eyes: Every defensive lineman should be able to see the ball no matter where he is lined up. While seeing the ball, he should also be able to see his man on key (O-lineman he is lined up on).
GET-OFF AND FIRST STEP: With the proper stance and eyes focused on the ball, the defensive line should be ready to �fire out of the blocks� as soon as the center moves the ball in any way!
The First Step: Should match the down hand (same hand, same foot) on the get off and replace where the down hand just left. This prevents false steps, stepping under yourself (crossing feet), and stepping too far. A good first step is imperative in keeping balance and attacking the line of scrimmage.
Once we establish the proper stance, get-off, and first step, we will begin our run block techniques with a progression of drills that isolate hands, feet, and get-off and then brings them all together to perform full escapes.
The First Step on a Slant or Loop: The SLANT Step (DEs). Aiming point is the crotch of the lineman that you are slanting to. Step with the inside foot first and rip hard with your outside arm while dipping the outside shoulder to get �skinny�. Key the lineman that you are slanting to and get your shoulders square as soon as possible.
The LOOP Step (DTs): SHOULDERS ALWAYS STAY SQUARE. Aiming point is the middle of the gap that you are looping to. The first step is with the foot closest to the direction in which you are looping. The first step must be flat and slightly upfield while ripping hard with the outside arm and shooting hands to the lineman you are looping to. Read the lineman you are looping to (Diagrams 1-A and 1-B).
Drill #1: 6 point leverage and step
Purpose: To emphasize the importance of the first step in gaining leverage while also using the hands to grab and control a blocker while maintaining gap integrity.
Equipment needed: none
Setting up the drill: Pair up each defensive lineman on hands and knees about a ball length apart and facing each other. Designate one side as defense and the other as offense. The offense will stay in a kneeling position with hands on their hips. The defense will be on hands and knees with a flat back and a bulled neck at ALL times. I will designate a shade by saying right or left and the �power hand� will always be the same hand as the shade (shade right = right hand the power hand). The power hand is the hand that will turn your blocker to keep your gap integrity.
Execution: Once everyone is set, I will start the drill on the whistle and every rep will continue on the whistle until I give two quick whistles to stop. Everyone that is shaded right and on the whistle must �shoot� their hands, with thumbs up, from the ground with the power hand grabbing the armpit area of the offensive player and the opposite hand grabbing the V neck area while locking out the offensive player. As soon as the lock out occurs, the player must push with the power hand and pull with the off hand as if busting open a door. At the same time, he begins to push/pull the defender and must also take one step with his inside foot so that it crosses the offensive player and the defender�s helmet finishes on the same side. Once that is done, they must immediately recoil with hands back on the ground, flat back and bulled neck ready for the next whistle.
Reps: We will do this for at least 1 set each shade with 4 reps with each hand.
Coaching points: Defenders must keep eyes up and back flat throughout the entire drill. Always make sure the hands get back to the ground before shooting them for the next rep and do not allow offensive bodies to turn with the power hand. They should be resistant and make the defender grab and push/pull violently.
Drill #2: Sled Drive
Purpose: To emphasize hand placement, arm extension, low pad level, get-off, and foot drive.
Equipment needed: A ball and 5-man sled.
Setting up the drill: The coach will stand on the sled behind the middle pad and snap the ball from there. One D-lineman is lined up on every pad except the middle one.
Execution: The coach gives a cadence and snaps the ball whenever he wants to. The D-line must see the ball and on the snap have great get-off and shoot their hands into their pads, lock out, heads up, and drive their feet. The coach ends the rep with the whistle.
Reps: We will do 4 series of 3 downs with a new group rotating in each series. One series for each group equals a quarter and each group will do 4 quarters with the Sled.
Coaching points: Players should keep a flat back with their heads up. DO NOT allow them to rest their face masks on the sled while driving. If the sled is uneven while they are driving it, then one side had a slow get off and/or one side is not driving their feet. If this happens, make them go again.
STEP 3: SEPARATE FROM BLOCKER
Drill #1: The Board Drill
Purpose: To emphasize separation and foot drive in a competitive atmosphere.
Equipment needed: 2 x 4 wooden boards or a half moon agility bag.
Setting up the drill: Line up one player at each end of the board with their down hand directly in front of the board.
Execution: On the coach�s whistle, each player will explode toward each other shooting their hands to see who gets inside first. The player with his hands inside and arms locked out wins.
Reps: Coach pairs up players to compete against each other at his discretion.
Coaching points: Players must keep one foot on each side of the board at all times. Watch for players stopping their feet on contact instead of driving their feet through contact.
STEP 4: ESCAPE BLOCKER
Drill #1: 2 point escape
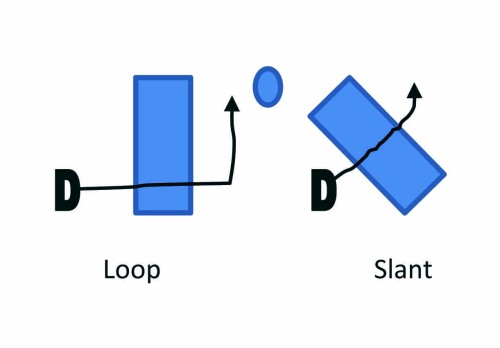
Diagram 1-A: Slant/Loop Right
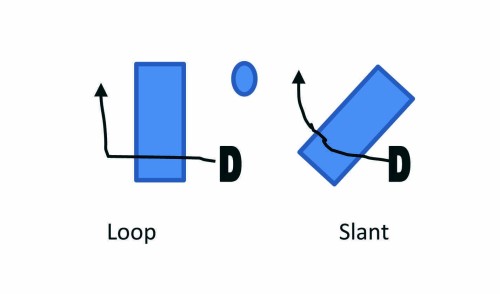
Diagram 1-B: Slant/Loop Left
Purpose: To emphasize a violent push/pull when escaping a block while also stepping through and driving the feet to secure your gap.
Equipment needed: none
Setting up the drill: Pair up each defensive lineman facing each other in a two- point stance. Designate one side to be defense and the other offense. The defensive side will begin the drill from �the fit� (hands in proper position to separate and escape with facemask in the offensive body�s chest) and knees bent. The offense will place their hands on the defender�s shoulders and provide some resistance once the drill starts. Designate a shade by saying right or left and the �power hand� will always be the same hand as the shade ( shade right = right hand the power hand).
Execution: Once everyone is ready, I will give one whistle to start the drill. On the whistle, the defender will violently separate from the fit by driving his feet and locking out his arms. As soon as the lock out occurs, he must use his power hand to push/pull the offensive body and finish by �ripping his gap�. To rip your gap the defender will open the offensive player like a door and use the power hand to pull the offensive player�s shoulder down and inside while simultaneously executing a violent rip with the off hand.
Reps: We will do this for at least 1 set each shade with 3 reps for each hand.
Coaching points: Defenders must keep eyes up and back flat throughout the entire drill. They will want to stand up being that they are starting in a two-point stance. Make sure the knees stay bent. The feet must NEVER stop! The O-line should take a reach step as if trying to hook the defender so they can apply some pressure.
Drill #2: Full escape under the chute/cage (Diagram 2)
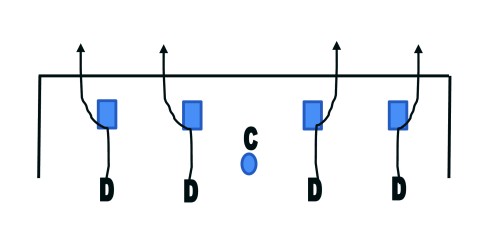
Diagram 2: Full Escapes
Purpose: To simulate the full process of stance, get-off, feet, hands and escapes as it may happen in a game with an extra emphasis on pad level.
Equipment needed: 4 hand shields and ball.
Setting up the drill: For this drill I will be the center and place a ball in the middle of the chute where the defense is half way under it. Have four with two on each side of the center. Scout players hold the shields securely under the chute at the waist of the center. The starting defensive line will crowd the ball and get into the proper stance. The defenders on the left will use their left hand as the power hand and the defenders on the right will use their right hand as the power hand.
Execution: Once everyone is ready, I will give one whistle to start the drill. On the whistle, the defender will violently separate from the fit by driving his feet and locking out his arms. As soon as the lockout occurs, he must use his power hand to push/pull the offensive player and finish by �ripping his gap�. To rip your gap the defender will open the offensive player like a door and use the power hand to pull the offensive player�s shoulder down and inside while simultaneously executing a violent rip with the off hand. If done correctly, the offensive player should fall forward.
Reps: We will do 4 series of 3 downs with a new group rotating in each series. The group that just finished holds the shields and the group who just held the shields goes to the back of the line. One series for each group equals a quarter. Each group will do 4 quarters of escapes.
Coaching points: Shield players must hold shields firm and off of the ground. Give a different cadence every rep before the ball is snapped to make sure the defensive line goes deaf and only focuses on the ball movement. Keep it rapid fire � as soon as a group finishes a rep, hustle to get right back under the chute to start the next one.
STEP 5: PURSUIT
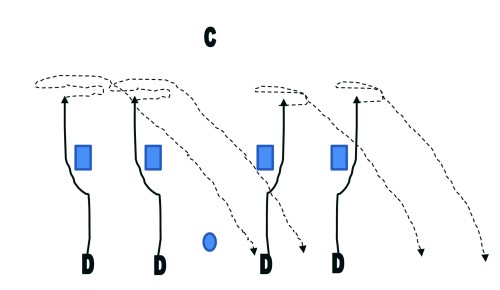
Diagram 3: Get Off, Grass and Wave
Drill #1: Get off, Grass and Wave (Diagram 3)
Purpose: To simulate get off by keying the ball, practicing agility by being able to get off of the ground quickly to transition to pass rush, and then pursuit after the ball is thrown.
Equipment needed: 2 footballs, 4 pop ups and 2 coaches.
Setting up the drill: Put 2 pop up dummies 4 yards deep on each side of the coach who is the center. Coach # 1 will be the center who snaps the ball. Players line up on the ball while coach #2 stands 5-yards away facing the L.O.S. with a ball in his hands.
Execution: On the snap, the defense gets off the ball with a quick first step while shooting their hands on air. Then they must execute an up/down on command, get up and run laterally down the L.O.S. on the second coaches command (point left or right) and work a pass rush move on the pop up dummies when the coach drops back with the ball. Finish the drill by sprinting back toward the L.O.S where the coach throws the ball (or just gives a throwing motion in that direction).
Reps: We will usually be doing this at the beginning of individual periods for one or two reps with each group depending on how well they execute.
Coaching points: After the snap, their eyes should be on the QB (coach #2) the entire time. At the end of the drill the entire group should sprint THROUGH the line of scrimmage where they started. If a player loafs at anytime during the drill, send the entire group right back to the front to do it again.
STEP 6: TACKLE
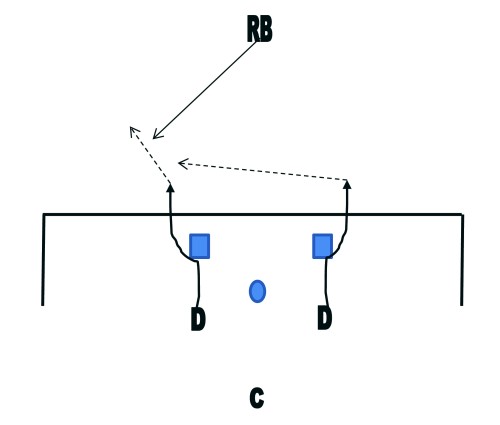
Diagram 4: Escape and Tackle
Drill #1: Escape and tackle (Diagram 4)
Purpose: To simulate a game situation where a defensive lineman gets off the ball, escapes a blocker and has a chance to make a tackle for a loss.
Equipment needed: Chute, 2 shields, and 2 balls
Setting up the drill: Two players will line up on the ball under the chute. Two other players will hold a shield in front of the players under the chute. There will need to be a coach or player moving the ball during the cadence. There will be one ball carrier 5-yards behind the chute with the ball in his hands. The coach running the drill will stand behind the running back.
Execution: The coach will start yelling out any cadence and the center will snap the ball anytime during the cadence. On the snap, the two defenders will get off the ball, lock out the shields and rip their gaps. The defender on the left of the center will rip and escape to the left while the defender on the right will rip and escape to the right. Before the snap, the coach will tell the running back to go left, right, or straight ahead. The running back will go in the direction given on the snap. The defenders must take the proper angle down the line of scrimmage and wrap up the ball carrier.
Reps: Each player will get one rep on each side of the ball.
Coaching points: Because he already has the ball in his hand, tell the running back to delay for one second after the snap before he starts running. You can also turn it into a turnover drill by having the first defender to the ball secure the tackle while the second strips the running back.
About the Author: Ron Cook was recently named head coach at Red Springs High School (NC). He previously was the defensive coordinator at nearby Lumberton High School. Cook has 11 years of coaching experience with six on the college level having been on the staffs of both Montclair State and American International College. He played collegiately at both Virginia Tech and Delaware.
Sign Up for the Play of the Week Newsletter
Subscribe
Login
Renew
Change Address
Customer service