
- Home
- Subscribe
- Magazine
Current Issue
- Table of Contents
- Feature Article
- Subscribe
- X's & O's Vault
- Gridiron Store
- Help
- Contact Us
The Only Four Running Plays You Need for Your Option Offense
© October, 2011
by Paul Anthony Markowski
Running Backs Coach • Mansfield University
There are literally hundreds of running plays that have been drawn up over the years. How does a coach determine which plays are the best? It is my belief that the answer lies in the old tried and true football principle called: KISS (otherwise known as Keep It Simple Stupid).
Four Plays is All You Need
This article diagrams and explains the four running plays that I believe to be the cornerstone of an option offense. The key to achieving success using these plays comes down to ensuring one thing - lots of repetition. These plays must be repped each and every practice - countless times. Your players will know these plays like the backs of their own hands. Since we only have four run plays, our players must become experts in executing all four plays. We will be better at running the plays than the defense will be at defending them. Each player on offense must truly believe that, as a unit, we cannot be denied. Having confident players leads to them playing aggressively. That is the key.
Veer (Diagram 1)
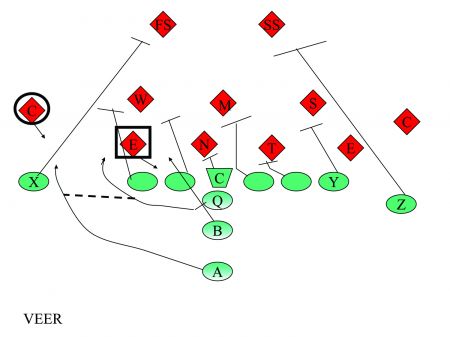
This is our bread and butter triple option play. It is really three plays in one. This is the one play that we must execute flawlessly as the other three plays “feed” off of the veer’s success.
Player Assignments/ Rules
QB: Mesh with diving B-back. Read your dive key (first defensive lineman face-up or outside of the playside OT). Eeither pull or give. If he gets a pull read, QB takes the ball and attacks the inside thigh of his pitch key (next defensive player outside of the dive key). QB either pitches or keeps.
B-Back: Aiming point is the crack of the butt of the playside OG and mesh with QB. If given ball, follow blocks. If ball is pulled, then block the dive key.
A-Back: Get into a 4X4 pitch relationship with the QB and keep your eyes on him at all times. If the ball is pitched, take to perimeter and follow blocks.
X (playside WR): Get to third level safety.
Z (backside WR): Cut off block on safety.
C: If covered, block man. If uncovered, protect playside gap. Combo with playside OG.
PSG: If covered, block man. If uncovered, get to second level backer.
PST: If covered, veer release to second level backer. If uncovered, get to second level backer.
BSG: Scoop towards playside gap (cut).
BST: Scoop towards playside gap (cut).
BSY: Get to second level.
Blast (Diagram 2)
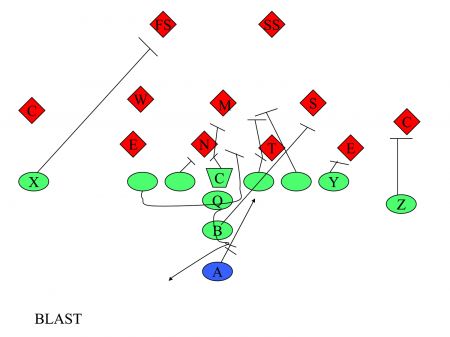
This is our A-back iso play. The iso block is performed by our B-back.
Player Assignments/ Rules
QB: At the snap, make an effort to vacate the QB/center area as you take your steps back (this allows room for the pulling lineman to get to his assignment). Handoff to A-back.
B-Back: Responsibility is for the widest LB in tackle box on the playside.
A-Back: Aiming point is the crack of the playside OG’s butt. Read blocks and cut off of what you see.
X (backside receiver): Get to third level safety for cut off block.
Z (play side receiver): Stock cornerback.
BST: Pull to playside A-gap and hammer first wrong color jersey.
BSG: If covered, man block. If uncovered, protect playside gap. Help center.
C: If covered, block man. If uncovered, protect playside gap. Help PSG.
PSG: If covered, block man. If uncovered, protect playside gap. Help OT.
PST: If covered, block man. If uncovered, protect playside gap. Get to second level.
PSY: If covered, block man. If uncovered, get to second level.
Counter Option (Diagram 3)
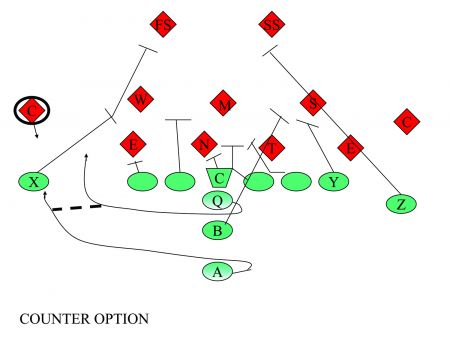
This play will keep the defense “honest” if they start to key on O-line/ back movement.
Player Assignments/ Rules
QB: Reverse out and immediately attack the pitch key (force defender); either keep the ball and get north, or pitch to trailing back.
B-Back: Track is into the crack of backside OG’s butt. Get to second level backer.
A-Back: Take a single counter step towards the backside. Then, get into a 4X4 pitch relationship with QB. If pitched the ball, follow blocks on the perimeter.
X (playside receiver): Get to second level backer. If no one shows, get to third level.
Z (backside receiver): Get to third level for cut off block on safety.
PST: If covered, block man. If uncovered, get to second level.
PSG: If covered, block man. If uncovered, get to second level.
C: If covered, block man. If uncovered, protect playside gap; help PSG. Get to second level.
BSG: Scoop towards playside gap (cut).
BST: Scoop towards playside gap (cut).
BSY: Get to second level.
Toss (Diagram 4)
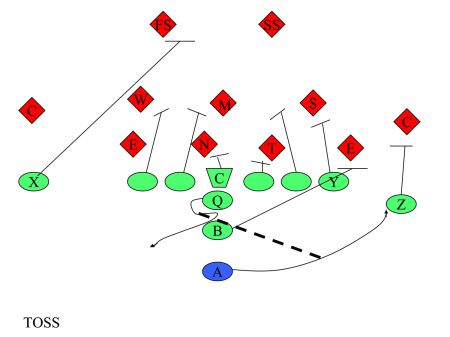
This is our quick hitting perimeter play.
Player Assignments/ Rules
QB: Reverse out and immediately toss ball to A-back.
B-Back: Get to edge and cut DE.
A-Back: Take pitch. Get to perimeter and follow blocks.
X (backside WR): Cut off block on safety.
Z (playside receiver): Stock cornerback.
BST: Get to second level.
BSG: Get to second level.
C: If covered, block man. If uncovered, protect playside gap.
Get to second level.
PSG: If covered, block man. If uncovered, protect playside gap.
Help PST. Get to second level backer.
PST: If covered, block man. If uncovered, protect playside gap.
Get to second level.
PSY: Get to second level backer.
About the author: Paul Markowski recently joined the staff of Mansfield University as running backs coach. He previously served as the fullbacks coach at Simon Fraser University. Markowski began coaching in 2008 as an assistant coach for the Charles County Lions, a semi-pro team in Waldorf, MD. He graduated from Lakeland University in Thunder Bay, Ontario.
Sign Up for the Play of the Week Newsletter
OFFENSE VIDEOS
MORE X's & O's

|
Home |
Magazine |
Back Issues |
Shopping |
Subscribe |
Contact
Girdiron Strategies PO Box 14041 North Palm Beach, FL 33408 p. 561-355-5068 Copyright 2024, Gridiron Strategies a division of AFM Media, LLC. All Rights Reserved. |
Subscribe
Login
Renew
Change Address
Customer service